To organize your deep pantry shelves like a pro, start by measuring your space and evaluating what you have. Create a zoning system for easy access—keep frequently used items at eye level. Use clear, stackable containers and tiered risers to maximize visibility. Incorporate lazy Susans and pull-out drawers for tricky spots. Label everything for quick identification and regularly declutter to stay on top of things. There’s more to discover that’ll help you master pantry organization!
Assessing Your Pantry Space
Before diving into organizing your deep pantry shelves, you should start by emptying everything out to get a clear picture of what you have. This lets you identify expired or unnecessary items you can discard or donate.
Next, measure your pantry space—width, depth, and height—to guarantee any storage solutions, like bins or shelves, fit properly without overcrowding.
As you assess, categorize items based on frequency of use. Place everyday essentials at eye level, while less frequently used items can go on higher or deeper shelves.
Consider using tiered risers or turntables for better visibility on those deep shelves, preventing items from hiding behind each other.
Finally, incorporate clear containers and label everything to enhance organization and maintain order easily. Additionally, regularly check expiration dates to ensure that your pantry remains organized and free from expired products.
Establishing a Zoning System
To establish an effective zoning system in your deep pantry, start by assigning specific areas for different categories, like baking supplies and snacks.
Make sure to prioritize frequently used items at eye level, so you can grab them easily. This organization not only streamlines access but also enhances overall efficiency in your pantry. Additionally, consider using clear containers or labels to improve item identification and maintain an organized space.
Assign Specific Zones
Establishing specific zones in your deep pantry can make a world of difference in how efficiently you navigate your cooking space.
Start by categorizing pantry items like baking supplies, snacks, and canned goods. Use food storage containers and stacking bins to maximize space and enhance organization.
Place frequently used items at eye level and toward the front for easy access, while less used items can go to the back or higher shelves.
Organize multiples of the same item in a row, ensuring the oldest expiration dates are in front to reduce waste.
Regularly scoot items forward to maintain visibility and accessibility, making it easier to find what you need while cooking or meal prepping.
Prioritize Frequently Used Items
Organizing your deep pantry isn’t just about creating zones; it’s also about prioritizing what you use most often. Place your frequently used items at eye level and toward the front of the pantry for easy access during meal prep. This makes cooking more efficient and enjoyable.
Store less frequently used items at the back, maximizing your space while keeping essentials accessible. Arrange multiples of the same item in a row, ensuring that the oldest expiration dates are in front to prevent spoilage.
Regularly scoot items forward to maintain visibility and encourage use before they expire. This thoughtful organization not only improves your pantry’s functionality but also enhances your overall cooking experience.
Measuring for Perfect Fit
To make the most of your deep pantry, you need to measure your shelves accurately.
Grab a tape measure and jot down the width, depth, and height of each shelf so you can choose containers that fit perfectly.
Consider how you’ll stack or arrange these items to maximize space and accessibility. A well-planned layout enhances accessibility and organization of your pantry items, ensuring you can easily find what you need.
Accurate Shelf Measurements
Accurate shelf measurements are essential for maximizing your deep pantry’s potential. Start by measuring the width, depth, and height of your pantry space, taking care to account for obstructions like door frames or electrical outlets.
Use a tape measure to capture measurements down to the nearest quarter inch, ensuring a precise fit for your containers. When measuring depth, consider the full depth of pantry shelves to avoid wasting space and keep items accessible.
Record your measurements in a notebook or on a digital device, noting any specific height restrictions. Always measure your containers, including handles or lids, to confirm they’ll fit comfortably within the designated shelf space, helping you organize effectively and enhance your storage solutions.
Container Sizing Considerations
When you choose containers for your deep pantry, it’s important to take into account their sizing to guarantee a perfect fit. Proper container sizing considerations will help you maximize your space and keep everything easy to find.
Here are some tips:
- Measure the width, depth, and height of your pantry shelves.
- Select stackable containers to layer items in 2-3 rows for better visibility.
- Choose clear containers with shorter sides facing out for easy scanning.
- Arrange items from shortest to tallest based on your shelf height.
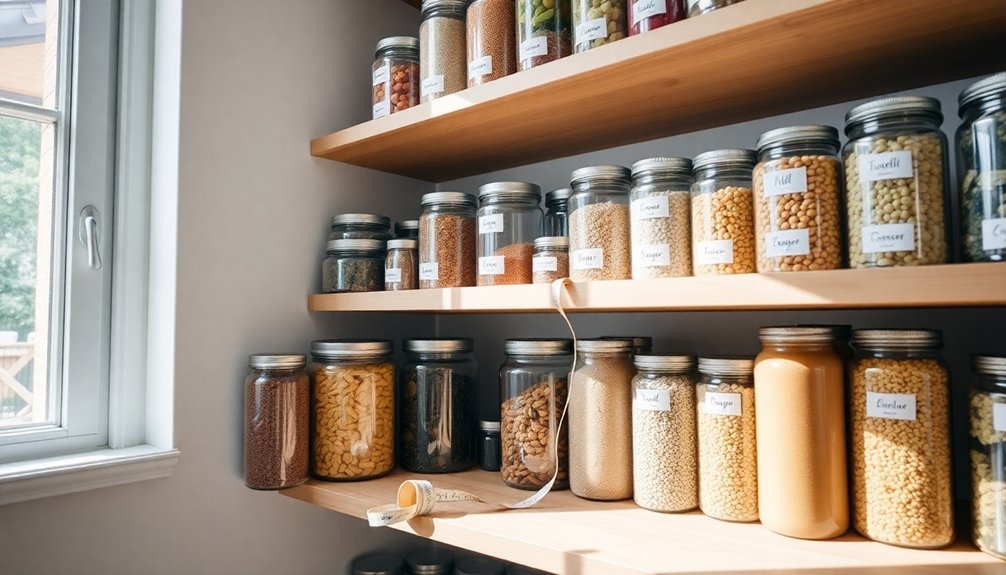
Selecting the Right Storage Containers
Selecting the right storage containers can make a world of difference in organizing your deep pantry shelves.
Choose stackable containers to maximize vertical space, ensuring they fit your pantry’s depth to prevent lost items. Clear bins with handles are perfect for easy retrieval and visibility, allowing you to identify contents at a glance.
For spices, utilize tiered risers, and for those hard-to-reach corners, lazy Susans offer great accessibility. Opt for durable options, like Rubbermaid Brilliance containers, that provide tight seals to keep food fresh. Additionally, implementing a labeling system ensures quick item identification and maintains streamlined organization.
Finally, consider labeling containers for easy identification. You can use painter’s tape and permanent markers for temporary labels or preprinted labels for a more polished look.
Happy organizing!
Utilizing Vertical Space
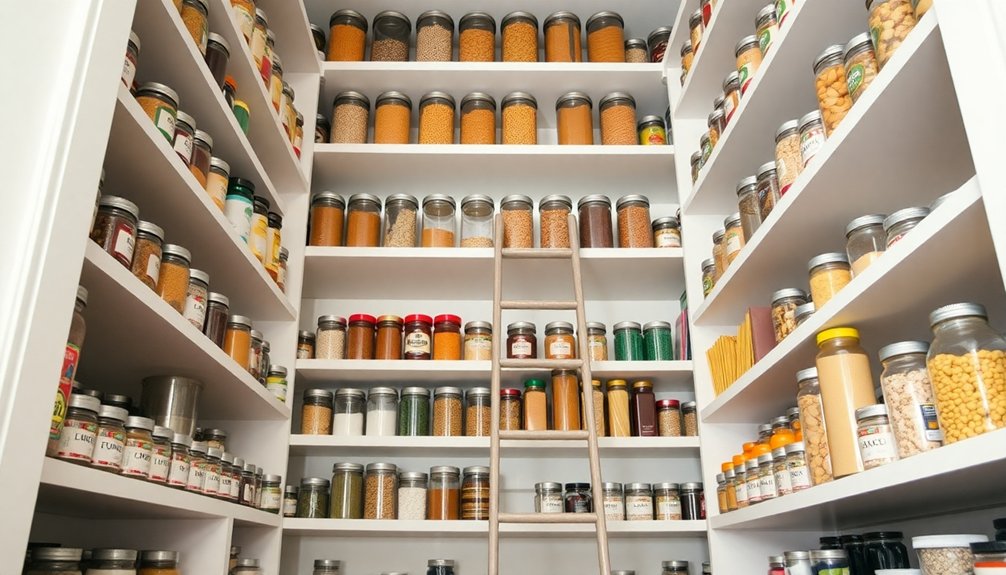
To truly maximize your deep pantry‘s potential, think vertically. Adding extra shelves and utilizing your pantry door can create more storage without overcrowding. This approach not only enhances visibility but also keeps everything organized and within reach. Consider using bins and baskets to group similar items together, optimizing your storage space even further.
Adding Vertical Shelves
Maximizing vertical space in your deep pantry can transform how you store and access your items.
By adding vertical shelves, you’ll enhance organization and accessibility, making it easier to find what you need.
Here are some tips:
- Install tiered risers for spices and condiments, creating a “stadium seating” effect.
- Incorporate narrow shelves or racks on pantry doors to utilize overlooked areas without sacrificing shelf space.
- Use clear bins that stack nicely and maintain visibility, keeping your pantry orderly.
- Regularly assess your layout to guarantee frequently used items are easily accessible, enhancing functionality.
With these strategies, your deep pantry won’t only look great but also work efficiently!
Utilizing Door Space
Releasing the potential of your pantry door can greatly enhance your storage capabilities. By utilizing door space, you can transform it into a valuable area for pantry organization.
Over-the-door organizers are perfect for storing small items like spices and seasoning packets, keeping them within easy reach. Consider adding narrow baskets or shelves inside the door for additional storage options that won’t occupy valuable shelf space.
An elfa door rack is another excellent choice, offering versatile storage without damaging the door. This efficient use of vertical space helps reduce clutter on your shelves and creates a more functional layout.
With frequently used items easily accessible, your pantry will look organized and serve your needs better.
Incorporating Drawers and Pull-Out Shelves
Incorporating drawers and pull-out shelves into your deep pantry can transform how you access and organize your food items. Here are some tips to get you started:
- Choose pull-out drawers that fit your pantry dimensions for better accessibility.
- Use clear storage containers within these drawers to maintain organization and visibility.
- Install adjustable shelving to customize the height of your storage, perfect for smaller items like tea packets and snack bars.
- Maximize storage potential by ensuring sliding drawers are neatly arranged for quick access to frequently used items.
These enhancements not only improve organization but also make your pantry more functional and visually appealing. Additionally, utilizing vertical space effectively can further enhance your pantry’s storage capacity.
Start measuring your space to find the right fit for your customized drawer units!
Maximizing Accessibility With Turntables
One effective way to enhance accessibility in your deep pantry is by using turntables. These handy organizers allow you to spin items into view, making it easy to retrieve what you need without reaching into the back.
Extra-large turntables from retailers like Target and IKEA are perfect for storing oils, condiments, and jars, keeping everything organized and clutter-free. You’ll find that utilizing turntables in corner cabinets and deep pantries helps access heavier jars and cans that are often difficult to reach.
The quick spin feature eliminates the hassle of knocking over items while searching for specific products. To further optimize visibility and accessibility, consider pairing turntables with tiered shelves, ensuring all your pantry items are easily reachable. Additionally, designating a specific area for frequently used items can greatly enhance your overall organization.
Organizing With Clear Labels
Clear labels can transform your deep pantry organization by making it easy to spot items at a glance. Here’s how you can effectively use clear labels to streamline your pantry:
- Choose Consistent Labeling: Use a label maker for professional-looking labels on all bins and baskets.
- Opt for Vinyl or Adhesive Stickers: These provide a clean aesthetic and are easy to update when pantry items change.
- Label Categories: Group similar pantry items together, like grains, snacks, and canned goods, for quick access.
- Regularly Reassess: Update labels as needed to maintain organization and prevent clutter.
Incorporating storage bins and baskets can further enhance your pantry’s organization, ensuring everything has its designated spot.
With clear labels, you’ll guarantee everyone knows where to find items, keeping your pantry neat and functional.
Managing Backstock Effectively
While managing backstock might seem like a challenging task, it’s essential for maintaining an organized and efficient pantry. Start by storing extra food items behind those you’re currently using. This way, you’ll use older products first, keeping everything fresh.
Organize your backstock by type—like canned goods, snacks, and baking supplies—making access easy and preventing overbuying. Limit the number of opened items to reduce duplicates and clutter.
Use clear containers or bins to guarantee visibility, helping you quickly identify what you have before heading to the grocery store. Regularly review your backstock inventory to avoid unnecessary purchases and keep your pantry labels up to date. This will streamline your pantry and enhance your cooking experience, ultimately contributing to a healthier cooking environment as proper organization can reduce the risk of spills and messes that could lead to grease accumulation.
Regular Maintenance and Decluttering
To keep your deep pantry in top shape, regular maintenance and decluttering are essential.
Establish a routine to guarantee your pantry stays organized and efficient. Here’s how you can do it:
- Assess contents: Regularly empty your pantry to check for expired items and donate those nearing expiration.
- Categorize items: Group similar products together for easy access and to quickly spot low inventory.
- Schedule decluttering: Set aside time at the start of each month to maintain order and prevent overwhelming clutter.
- Integrate pantry checks: During grocery shopping, “shop your pantry” first to minimize waste and avoid duplicate purchases.
Additionally, remember to regularly reassess belongings to prevent clutter buildup and maintain a functional space.
Conclusion
Now that you’ve mastered the art of organizing your deep pantry shelves, imagine opening those doors to a perfectly arranged space every time. With your zones established, containers selected, and labels in place, you’re just a few steps away from a pantry that not only looks great but works efficiently. But wait—what’s lurking in the back? Regular maintenance is key. Keep up with your system, and you’ll never be caught off guard by a chaotic pantry again!